TL;DR: Quick Summary
- Takeaway 1: Plan your layout and confirm measurements before starting Solar panel tilt angle by latitude RV guide.
- Takeaway 2: Work through each step in order and verify connections before moving to the next.
- Takeaway 3: Test the completed installation with a multimeter to confirm correct polarity and voltage.
Introduction
Step-by-Step: Setting Your RV Solar Panel Tilt Angle
- Determine your current latitude. Open any GPS or mapping app on your phone. Note the latitude to the nearest whole degree. Example: camped near Sedona, AZ, your latitude is approximately 34.8°N—round to 35°.
- Identify the current season. Use three broad categories: Summer (April through August), Winter (November through February), and Spring/Fall (March, September, October). This determines which formula to apply.
- Calculate your target tilt angle. Apply the appropriate formula:
- Summer: Tilt = Latitude − 15°
- Spring/Fall: Tilt = Latitude
- Winter: Tilt = Latitude + 15°
Using our Sedona example in July (summer): Tilt = 35° − 15° = 20°.
- Orient your panel toward true south. Use a compass app corrected for magnetic declination, or look up your local declination on NOAA’s website. In Sedona, magnetic declination is about +10°E, so magnetic south reads 190° on a standard compass—aim for that reading to face true south (180° true).
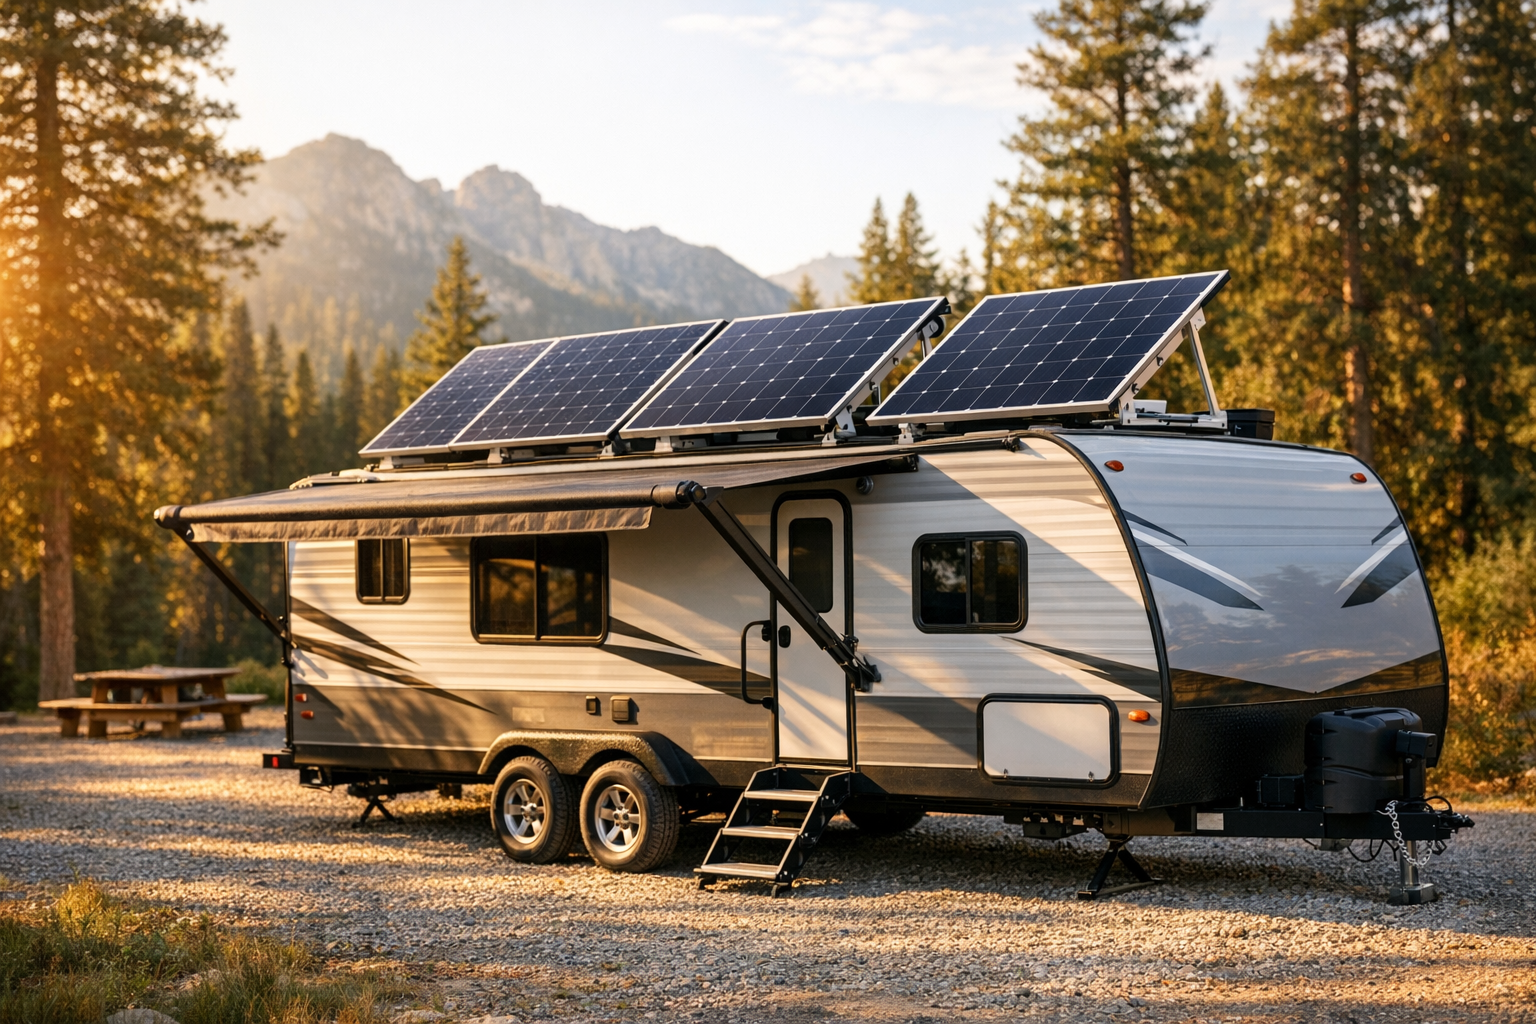
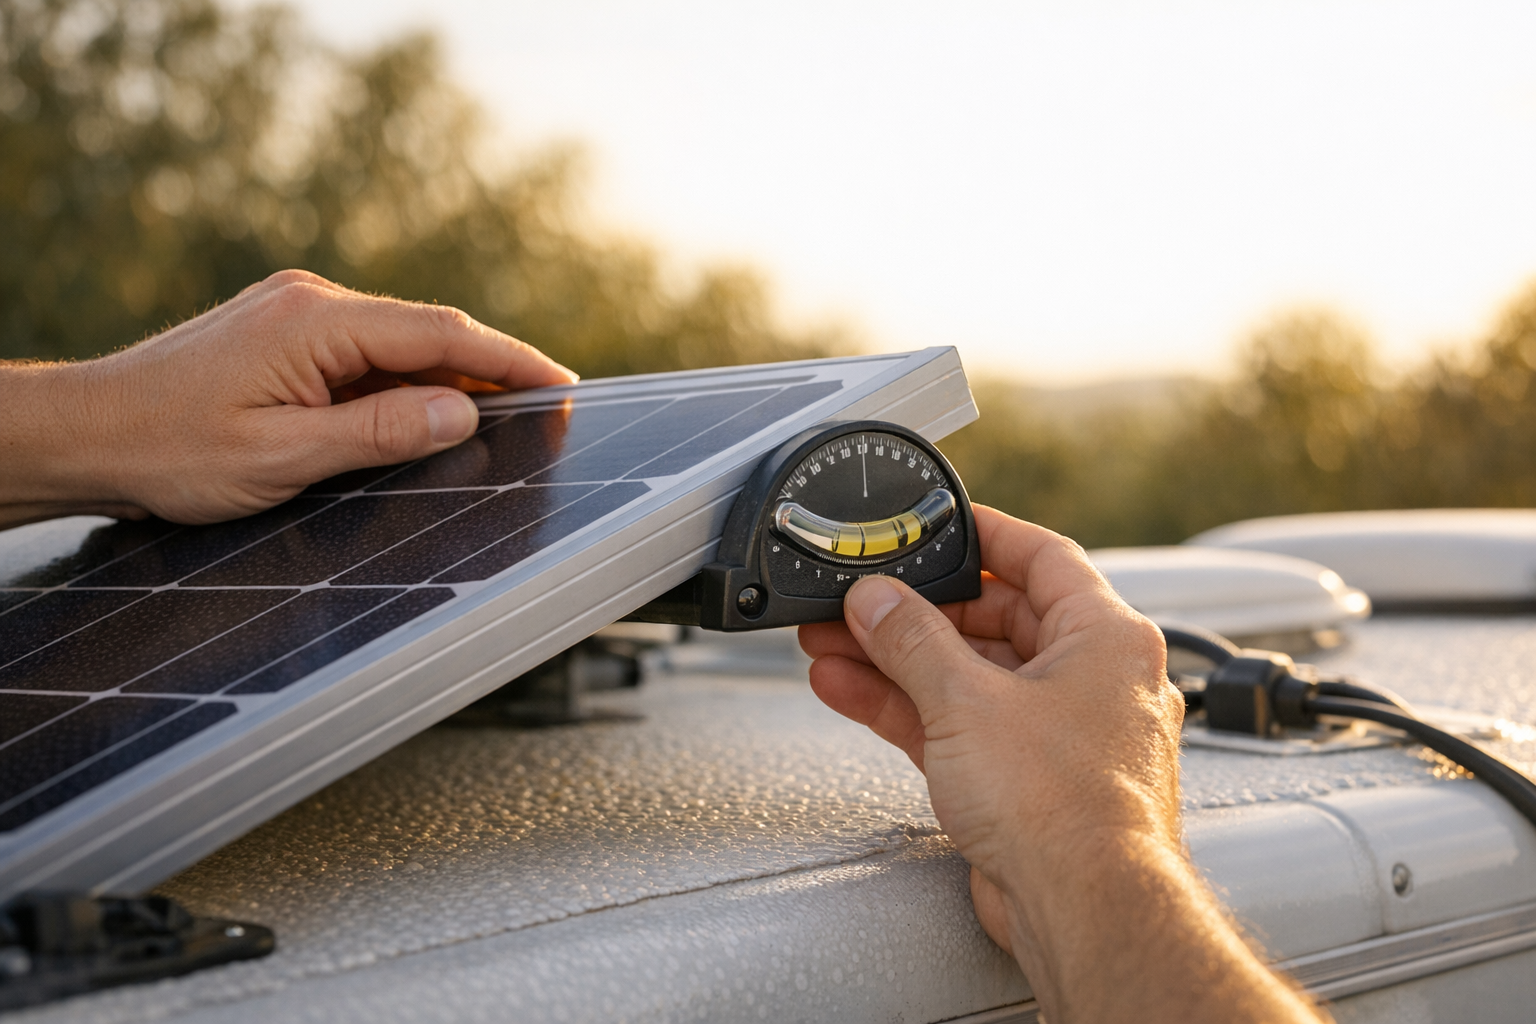
- Adjust the tilt bracket. Loosen the locking mechanism on your adjustable arm. Raise the panel’s north-facing edge until your inclinometer app reads the target angle (20° in our example). Tighten the lock firmly.
- Check for shading obstructions. Walk around the RV and note any shadows from AC units, antennas, vent covers, or nearby trees that will cross the panel between 9 AM and 3 PM. If shading is unavoidable, consider repositioning the RV or using a ground-mounted pole system to move the panel into full sun.
- Apply the 33% spacing rule if you have multiple tilted panels. Measure the height of the tilted panel’s raised edge above the roof. Ensure the gap between the back of one panel and the front of the next is at least one-third of that height. For a panel tilted to 30° with a raised edge 15 inches above the roof, the minimum gap is 15 ÷ 3 = 5 inches.
- Verify system performance. After adjustment, monitor your charge controller’s input wattage at solar noon. On a clear day, a properly tilted panel should produce 75–85% of its STC rating (accounting for temperature derating and real-world losses). If output is significantly lower, recheck tilt, azimuth, and shading. See MPPT charge controllers for interpreting charge controller data.
- Re-flatten panels before driving. Lower all panels to 0° and lock the tilt arms in the stowed position. Inspect that no bracket hardware is loose. Tilted panels in transit act as wind sails and can be ripped from the roof at highway speeds.
- Repeat at each new campsite. Every time you relocate—especially if you have changed latitude by more than 3–5 degrees or moved into a new season—recalculate and readjust. The process becomes second nature after a few stops.
Quick Reference
Why Tilt Angle Matters for RV Solar Panels
How do I solar panel tilt angle by latitude rv guide?
Solar cells generate the most electricity when sunlight strikes them at a 90° angle—perpendicular to the panel surface. Every degree away from perpendicular increases the effective air mass the light must travel through and spreads the same photon flux over a larger cell area, reducing power output. This relationship follows a cosine function
At a 0° angle of incidence the panel captures 100% of available direct irradiance. At 25° off-perpendicular, output drops to about 91%. At 60° off-perpendicular, it plummets to 50%.
For an RV parked at 45°N latitude in December, a flat-mounted panel faces the midday sun at roughly 68° off-perpendicular—capturing barely 37% of potential direct-beam energy. Tilting the panel to match the sun’s elevation angle recovers most of that loss.
Fixed vs. Adjustable Mounts on an RV
Flat, fixed mounts are the default on most RV installations because they are aerodynamic, low-profile, and require zero adjustment. They work acceptably in summer at lower latitudes (25–35°N) where the sun is high, but they leave significant energy on the table during winter months and at higher latitudes.
Adjustable tilt mounts let you angle panels between 0° and roughly 45–60°, depending on the bracket design. The trade-off is added setup time (typically 2–5 minutes per panel) and the need to lay panels flat before driving. For boondockers who park for days at a time, the 10–30% energy gain easily justifies the effort.
| Feature | Fixed Flat Mount | Adjustable Tilt Mount |
|---|---|---|
| Typical tilt range | 0° (flat) | 0°–60° |
| Energy loss vs. optimal tilt | 10–30% | 0–5% (when set correctly) |
| Setup time per panel | None | 2–5 minutes |
| Wind resistance while parked | Low | Moderate (secure in high wind) |
| Transit ready | Always | Must flatten before driving |
| Cost per bracket pair | $15–$30 | $40–$90 |
How to Calculate Solar Panel Tilt Angle by Latitude
The General Rule — Latitude Equals Tilt Angle
The simplest rule of thumb: set your tilt angle equal to your latitude. At 35°N, tilt to 35°. At 48°N, tilt to 48°. This approximation maximizes annual energy harvest because it averages the sun’s seasonal path across the sky. For RV owners who adjust their tilt only once and leave it, latitude-equal-tilt is the best single setting.
The underlying math is straightforward. The sun’s elevation angle at solar noon on any day is
Solar elevation = 90° − latitude + declination
Declination ranges from +23.45° on the summer solstice to −23.45° on the winter solstice. The optimal tilt angle to make the panel perpendicular to the sun at noon is
Optimal tilt = 90° − solar elevation = latitude − declination
Averaged over the year, declination nets to roughly 0°, so optimal tilt ≈ latitude.
Seasonal Adjustments for Maximum Efficiency
If you adjust your panels seasonally—or every time you relocate your RV—you can squeeze out an additional 5–15% of energy compared to a fixed latitude-equal tilt. The widely accepted seasonal formulas are
| Season | Formula | Rationale |
|---|---|---|
| Summer (Apr–Aug) | Latitude × 0.9 − 23.5° or Latitude − 15° | Sun is high; shallower tilt captures more midday energy |
| Spring / Fall (Mar, Sep–Oct) | Latitude | Sun path is near the annual average |
| Winter (Nov–Feb) | Latitude × 0.9 + 29° or Latitude + 15° | Sun is low; steeper tilt faces the panel toward the horizon |
The “Latitude ± 15°” shortcut is easier to remember and yields results within 1–2° of the more precise multiplier formulas for latitudes between 25° and 50°—the range covering virtually all RV travel in the continental United States and southern Canada.
Quick-Reference Tilt Angle Chart by Latitude
The table below gives pre-calculated tilt angles for common RV travel latitudes using the ± 15° seasonal adjustment method. Find the latitude closest to your current campsite and read across.
| Latitude (°N) | Example RV Locations | Summer Tilt | Spring/Fall Tilt | Winter Tilt | Year-Round Fixed Tilt |
|---|---|---|---|---|---|
| 25° | Key West FL, South Texas border | 10° | 25° | 40° | 25° |
| 28° | Orlando FL, Houston TX | 13° | 28° | 43° | 28° |
| 30° | Jacksonville FL, New Orleans LA | 15° | 30° | 45° | 30° |
| 32° | Tucson AZ, Dallas TX | 17° | 32° | 47° | 32° |
| 34° | Phoenix AZ, Los Angeles CA | 19° | 34° | 49° | 34° |
| 36° | Las Vegas NV, Nashville TN | 21° | 36° | 51° | 36° |
| 38° | San Francisco CA, Denver CO | 23° | 38° | 53° | 38° |
| 40° | Salt Lake City UT, Indianapolis IN | 25° | 40° | 55° | 40° |
| 42° | Chicago IL, Boston MA | 27° | 42° | 57° | 42° |
| 44° | Portland OR, Minneapolis MN | 29° | 44° | 59° | 44° |
| 46° | Seattle WA, Bangor ME | 31° | 46° | 61° | 46° |
| 48° | Northern Montana, Southern BC | 33° | 48° | 63° | 48° |
| 50° | Winnipeg MB, Vancouver Island BC | 35° | 50° | 65° | 50° |
Note: Most adjustable RV tilt brackets max out around 60°. If the table suggests a winter tilt above 60°, set the bracket to its maximum and accept the small residual loss.
Best Adjustable Tilt Mounts for RV Solar Panels
Types of RV-Compatible Tilt Brackets
Three main categories of adjustable tilt mounts work on RV roofs
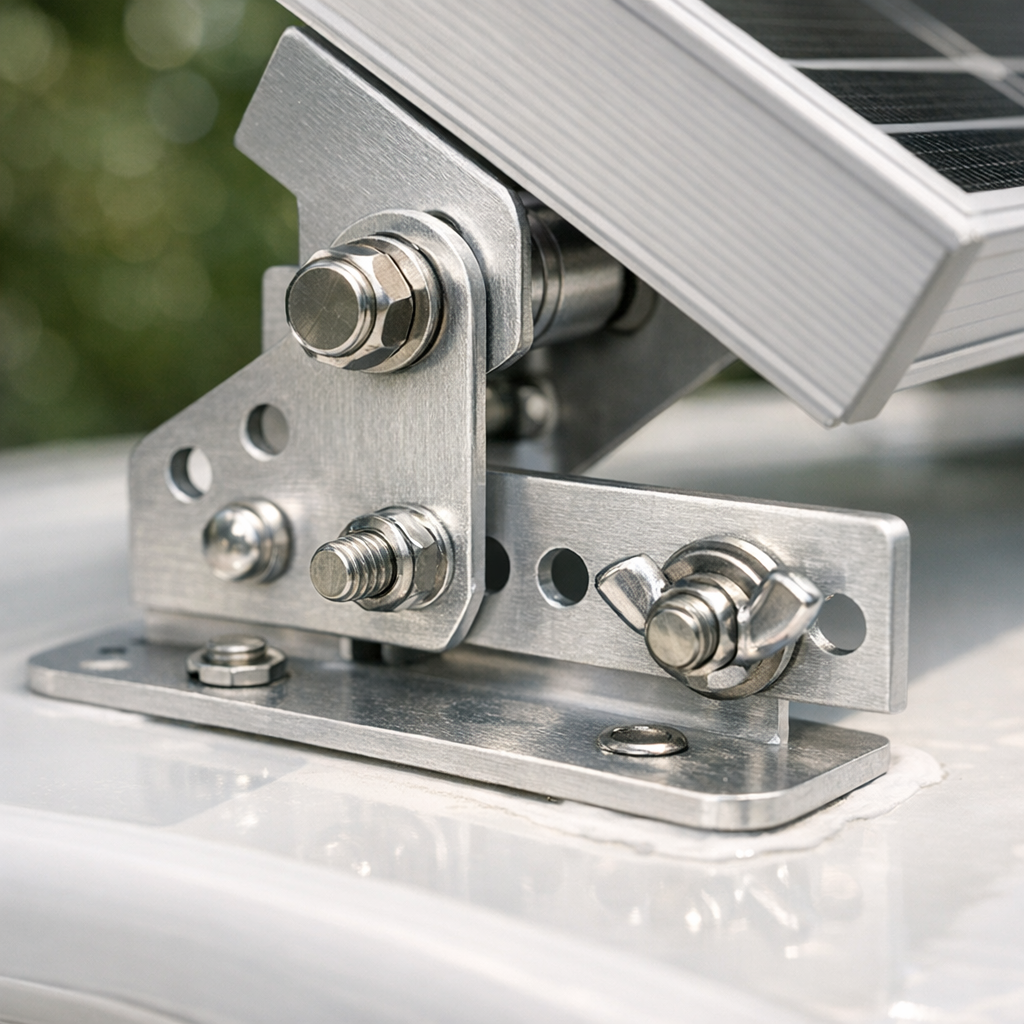
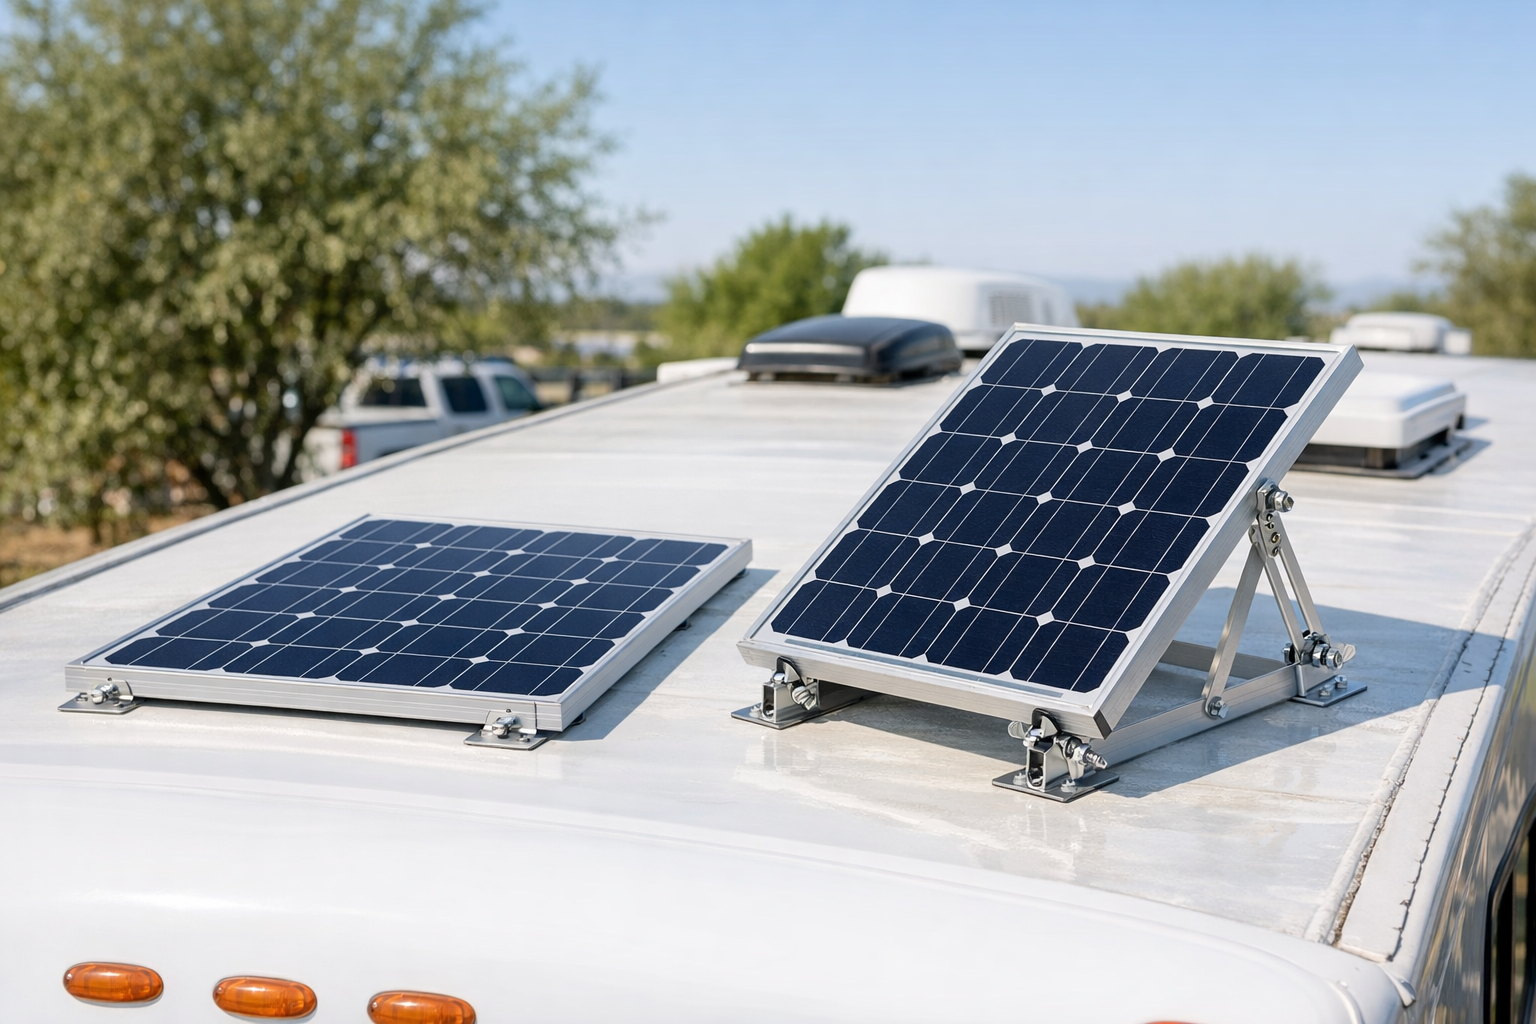
- Hinge-and-arm brackets: A fixed hinge along one edge of the panel and an adjustable telescoping arm on the opposite edge. Tilt is set by extending or retracting the arm. These are the most common, least expensive, and easiest to install. Typical tilt range: 0°–60°.
- Multi-position ratchet mounts: Similar to hinge brackets but with a ratcheting mechanism that locks at preset angles (e.g., 10°, 20°, 30°, 40°, 50°). Faster to adjust but less granular.
- Pole-mount tilt systems: A ground-based pole with a tilting head. Not roof-mounted—ideal for RVers who prefer to set panels on the ground beside the rig to avoid roof access. Tilt range: 0°–90°. Heavier and bulkier to store.
For most RV owners, hinge-and-arm brackets offer the best balance of cost, adjustability, and low profile during transit. Ensure the bracket is rated for your panel dimensions and weight—most standard 100 W panels weigh 15–20 lbs, while 200 W panels can reach 25–30 lbs.
How to Install and Adjust Tilt Mounts on Your RV Roof
Installation typically involves four steps
- Clean and prep the roof surface. Use isopropyl alcohol to remove dirt and oxidation from the mounting area.
- Position the hinge rail along the panel’s south-facing edge (the edge that will stay low). Mark and pre-drill holes, then seal each penetration with self-leveling lap sealant rated for your roof type (EPDM, TPO, or fiberglass).
- Bolt the hinge rail through the roof into the underlying structure or use VHB (very high bond) adhesive pads for a no-drill solution. No-drill adhesive mounts are rated for up to 30 lbs per pad and work well on smooth fiberglass roofs.
- Attach the adjustable arm bracket to the opposite edge of the panel. Run your solar cables through weatherproof cable entry plates and connect to your charge controller. See MPPT charge controllers for controller selection and RV solar cable sizing for proper wire gauge.
To adjust tilt in the field, loosen the arm’s locking knob, raise or lower the panel to the desired angle (use a digital inclinometer app on your phone for precision), and re-tighten. The entire process takes under three minutes once practiced.
Optimizing Solar Panel Angle While Traveling
Adjusting Tilt as You Change Latitudes
One of the unique advantages—and challenges—of RV solar is that your latitude changes as you travel. A snowbird who winters in Quartzsite, AZ (33.7°N) and summers in Glacier National Park, MT (48.5°N) spans nearly 15 degrees of latitude. That is a 15° swing in optimal tilt angle on top of the seasonal adjustment.
A practical approach
- Check your latitude each time you set up camp. Your phone’s GPS or any mapping app displays it.
- Apply the seasonal formula: Summer tilt = latitude − 15°; Winter tilt = latitude + 15°; Spring/Fall tilt = latitude.
- Round to the nearest 5°—the energy difference between 33° and 35° is less than 0.5%, well within measurement noise.
Azimuth Orientation Tips for Parked RVs
Tilt angle is only half the equation. Azimuth—the compass direction your panel faces—matters just as much.
In the Northern Hemisphere, panels should face true south (azimuth 180°) for maximum daily energy. True south differs from magnetic south by your local magnetic declination, which ranges from −15° to +20° across North America.
When you cannot park with your roof oriented perfectly south, here is how much energy you lose at various azimuth offsets (at 40°N latitude, summer)
| Azimuth Offset | Direction Example | Approximate Daily Energy Loss |
|---|---|---|
| 0° (true south) | S | 0% |
| ±15° | SSE / SSW | 1–2% |
| ±30° | SE / SW | 3–5% |
| ±45° | ESE / WSW | 6–10% |
| ±90° | E / W | 15–25% |
| 180° (north) | N | 40–60% |
If your RV is parked facing east-west and your panels are fixed to the roof, you cannot change the azimuth without moving the rig. Ground-mounted pole systems solve this problem entirely—you plant the pole on the sunny side and aim it due south regardless of how the RV is parked.
Tools and Apps to Find Your Optimal Angle on the Road
You do not need to memorize formulas. Several free tools do the math instantly
- SolarPanelTilt.com: Enter your latitude or city name and get year-round and seasonal tilt recommendations.
- Solartap Solar Panel Angle Calculator: Provides monthly optimal tilt angles and expected energy output for your coordinates.
- Sun Surveyor (iOS/Android): Uses your phone’s camera and GPS to overlay the sun’s path on a live view. Excellent for checking shade obstructions at a new campsite.
- Inclinometer apps (free): Place your phone on the panel surface to read the current tilt angle in real time.
- PVGIS (EU Joint Research Centre): A web-based tool that models solar irradiance for any location on Earth. Input your coordinates, panel tilt, and azimuth to get monthly kWh estimates.
Key Data & Reference Table
The table below consolidates the critical numbers every RV solar owner should know when setting panel tilt angles.
| Parameter | Typical Value / Range | Notes |
|---|---|---|
| Optimal year-round tilt | Equal to site latitude | Best single fixed angle for annual energy |
| Summer tilt adjustment | Latitude − 15° | Shallower angle for high summer sun |
| Winter tilt adjustment | Latitude + 15° | Steeper angle for low winter sun |
| Energy loss from flat mount | 10–30% | Worst at high latitudes in winter |
| Cosine loss at 25° off-perpendicular | ~9% | cos(25°) ≈ 0.906 |
| Cosine loss at 60° off-perpendicular | ~50% | cos(60°) = 0.50 |
| Adjustable bracket tilt range | 0°–60° | Most RV hinge-and-arm brackets |
| Optimal azimuth (Northern Hemisphere) | 180° (true south) | Adjust for local magnetic declination |
| Energy loss at ±45° azimuth offset | 6–10% | Acceptable if parking options are limited |
| Sun declination range | −23.45° to +23.45° | Drives seasonal tilt changes |
| 33% spacing rule | Row gap ≥ ⅓ × panel height | Prevents inter-row shading on tilted panels |
| Typical RV panel weight (100 W) | 15–20 lbs | Verify bracket load rating |
| Typical RV panel weight (200 W) | 25–30 lbs | May need reinforced brackets |
Worked Example
Below is a complete real-world scenario for an RV owner traveling from southern Arizona in January to the Pacific Northwest in July.
Scenario A: January in Quartzsite, AZ
- Latitude: 33.7°N → round to 34°
- Season: Winter
- Formula: Tilt = Latitude + 15°
- Tilt = 34° + 15° = 49°
Solar noon elevation on January 15 at 34°N
- Declination on Jan 15 ≈ −21.3°
- Solar elevation = 90° − 34° + (−21.3°) = 34.7°
- Ideal tilt for perpendicular incidence = 90° − 34.7° = 55.3°
- Our formula gives 49°, which is 6.3° off ideal noon—but it better captures morning and afternoon sun, maximizing total daily energy rather than just peak noon output.
- Cosine loss at 6.3° off-perpendicular: cos(6.3°) = 0.994 → only 0.6% loss at noon.
Energy comparison (200 W panel, Quartzsite, January):
| Configuration | Estimated Daily Output (Wh) | % of Optimal |
|---|---|---|
| Flat (0° tilt) | 620 Wh | 72% |
| Latitude tilt (34°) | 790 Wh | 92% |
| Winter tilt (49°) | 860 Wh | 100% |
Tilting to 49° recovers 240 Wh/day compared to flat—enough to run an LED light setup for an entire evening or add 20 Ah to a 12 V battery bank.
Scenario B: July in Bend, OR
- Latitude: 44.1°N → round to 44°
- Season: Summer
- Formula: Tilt = Latitude − 15°
- Tilt = 44° − 15° = 29°
Solar noon elevation on July 15 at 44°N
- Declination on Jul 15 ≈ +21.5°
- Solar elevation = 90° − 44° + 21.5° = 67.5°
- Ideal noon tilt = 90° − 67.5° = 22.5°
- Our formula gives 29°, which is 6.5° steeper than ideal noon—again a deliberate compromise to capture more morning/afternoon energy over the full day.
Energy comparison (200 W panel, Bend OR, July):
| Configuration | Estimated Daily Output (Wh) | % of Optimal |
|---|---|---|
| Flat (0° tilt) | 980 Wh | 88% |
| Summer tilt (29°) | 1,110 Wh | 100% |
| Winter tilt (59°) | 830 Wh | 75% |
In summer at higher latitudes, the penalty for flat mounting is smaller (12%) because the sun is already high. But the penalty for leaving panels at a winter angle is severe—a 25% loss. This underscores why seasonal adjustment matters even if you stay at the same latitude year-round.
The key takeaway from both scenarios: seasonal tilt adjustment consistently delivers 8–28% more energy than flat mounting, and using the wrong season’s tilt can be worse than no tilt at all. The simple ± 15° rule keeps you within a few percent of the theoretical maximum without complex calculations.
Common Mistakes RV Owners Make With Solar Panel Tilt
Even experienced RV solar users fall into these traps

- Never adjusting after installation. A panel locked at 35° all year at 42°N latitude loses 8–12% of potential winter energy compared to a seasonal adjustment.
- Ignoring azimuth. A perfectly tilted panel facing east instead of south can lose 15–25% of daily energy. Always orient toward true south when parked.
- Using magnetic south instead of true south. Magnetic declination can reach 20° in parts of the eastern United States. A 20° azimuth error costs 3–5% of daily output.
- Forgetting the 33% spacing rule. Tilting panels without adequate spacing causes the front panel to shade the one behind it during morning and afternoon hours. This is especially problematic with series-wired panels, where shading one cell can reduce the entire string’s output.
- Leaving panels tilted while driving. Wind load on a tilted panel at 65 mph can exceed 50 lbs per square foot—enough to tear brackets from the roof, damage the panel, and create a highway hazard. Always flatten and lock before transit.
- Over-tilting in summer. Some owners assume steeper is always better. In summer at 30°N, a 45° tilt actually produces less energy than a 15° tilt because the panel faces away from the high midday sun.
- Neglecting partial shading from RV components. Rooftop AC units, satellite dishes, and antenna masts cast shadows that move throughout the day. A shadow covering even 10% of a panel can reduce output by 30–50% on panels without bypass diodes. Survey your roof shadow patterns before choosing panel placement.
Safety Considerations
- Roof safety: RV roofs can be slippery, especially when wet or covered in morning dew. Wear soft-soled shoes, use a stable ladder rated for your weight, and never step on unsupported roof sections. If possible, adjust tilt brackets from the roof edge or from a ladder without walking on the surface.
- Electrical safety: Solar panels produce voltage whenever exposed to light—there is no off switch. Before handling wiring or connectors, cover panels with an opaque blanket to reduce output to near zero. Use MC4-compatible connectors and ensure all connections are weatherproof. Refer to RV solar cable sizing for proper wire gauge to prevent overheating.
- Wind precautions: Secure all tilt brackets with locking hardware. In sustained winds above 30 mph, lower panels to the flat position to prevent structural damage to both the panel and the roof.
- Weight limits:
Recommended Gear
- Victron SmartSolar MPPT 100/30 — View on Amazon
- Renogy 100W Monocrystalline Panel — View on Amazon
- Battle Born 100Ah LiFePO4 Battery — View on Amazon
FAQs
- What is the best angle for solar panels by latitude? This depends on your specific setup and requirements. Check the sections above for detailed guidance.
- How to determine sun angle at any latitude? This depends on your specific setup and requirements. Check the sections above for detailed guidance.
As an Amazon Associate, we earn from qualifying purchases. This helps keep SunAmpRV running.